Showing posts with label atari 2600. Show all posts
Showing posts with label atari 2600. Show all posts
Tuesday, October 27, 2015


Tuesday, August 25, 2015
Sunday, May 24, 2015

Friday, March 29, 2013
Atari 2600 Development in OSX Using DOS Box
Atari 2600 development is easy under OS X using DOS Box.
You will need:
• Dos Box - http://www.dosbox.com/
• DASM - http://www.atariage.com/2600/programming/2600_101/bin/dasm.zip
• Stella - http://stella.sourceforge.net/downloads.php
• VCS.H - http://www.atariage.com/2600/programming/2600_101/bin/vcs.h
Step-by-step:
• Make a new directory under OS X for DOS
• Copy DASM, and VCS.H to this DOS directory
• Mount this DOS directory as a virtual disk in DOS Box.("mount c ~/dos" for example)
• To compile a ROM, enter "dasm input_file_name.asm -f3 -ooutput_file_name.bin"
• To edit a .asm code file, use Textedit
• To run a .bin ROM image, use Stella
You will need:
• Dos Box - http://www.dosbox.com/
• DASM - http://www.atariage.com/2600/programming/2600_101/bin/dasm.zip
• Stella - http://stella.sourceforge.net/downloads.php
• VCS.H - http://www.atariage.com/2600/programming/2600_101/bin/vcs.h
Step-by-step:
• Make a new directory under OS X for DOS
• Copy DASM, and VCS.H to this DOS directory
• Mount this DOS directory as a virtual disk in DOS Box.("mount c ~/dos" for example)
• To compile a ROM, enter "dasm input_file_name.asm -f3 -ooutput_file_name.bin"
• To edit a .asm code file, use Textedit
• To run a .bin ROM image, use Stella
Sunday, March 03, 2013
A26F: Custom Waveform and Three Voice Polyphony
The Atari 2600 sound chip is limited to two programmable voices, each with a selection of pre-defined waveforms.
This is a demonstration of a custom waveform channel that can be used - to some degree - to overcome some of the limitations imposed on the Atari 2600 sound chip. The custom waveform is user-defineable and can be changed during runtime.
The custom waveform also allows for a much wider range of frequencies. Additionally, the custom waveform can be used at the same time as the main two oscillators, thereby - with some clever sequencing - giving rise to three-voice polyphony.
This feature will be included in the next A26F firmware update.
A26F: Atari 2600 As Audio DAC and Sound Generator
Github is here: https://github.com/little-scale/a26f
This is a working demonstration of a new feature that will be included in the next A26F update. Channel 1 of the Atari 2600 sound chip is used purely as a DAC for an input audio signal channel 2 is used as per normal (as a limited oscillator).
The drums, pitch shifted voice samples and droning lead synths are all external audio which are fed to the Atari 2600 and played back on channel 1 in real time. The arpeggio and noise sounds are coming from the channel 2 oscillator.
Note that all audio that is heard in this video is directly from the Atari 2600!
This feature will be included in the next A26F firmware update.
The drums, pitch shifted voice samples and droning lead synths are all external audio which are fed to the Atari 2600 and played back on channel 1 in real time. The arpeggio and noise sounds are coming from the channel 2 oscillator.
Note that all audio that is heard in this video is directly from the Atari 2600!
This feature will be included in the next A26F firmware update.
Saturday, March 02, 2013

How To: Make An Atari 2600 MIDI Music Interface
Overview
The A26F is a MIDI interface for the Atari, allowing you to sequence chipmusic on a real Atari 2600 console using modern MIDI sequencing software.
If you enjoy this post, please like my Facebook page or follow this blog for future A26F updates.
Many thanks go out to Paul Slocum for his amazing work with Atari 2600 music.
The A26F is a MIDI interface for the Atari, allowing you to sequence chipmusic on a real Atari 2600 console using modern MIDI sequencing software.
If you enjoy this post, please like my Facebook page or follow this blog for future A26F updates.
Many thanks go out to Paul Slocum for his amazing work with Atari 2600 music.
Github is here: https://github.com/little-scale/a26f
Demo Videos
Quick Start Instructions
This post marks the release of the Atari 2600 MIDI (A26F) device, as well as the release of the A26F v100 firmware.
The code etc for this is open and free to use. Please do not commercialise this. It is not for making money. It is for making cool chiptune musics. I encourage you to build one of these. It is easy and shouldn't take long. I encourage you to hack the code and play and have fun with it. If you would like to make a batch of these available, please get in touch.
The aim of this post is to cover a simple hardware setup that can be used to create an A26F interface. This is achieved via an Atari Age 4K cartridge, a 2764 EPROM and a Teensy 2 microcontroller. Other methods are possible too.
MIDI Mapping
• MIDI Channel 1 is Atari TIA Channel 1
• MIDI Channel 2 is Atari TIA Channel2
• Velocity is mapped to 16 steps of amplitude for each channel
• MIDI CC #1 sets the instrument type
• MIDI CC#11 can also set the volume (independent of the velocity)
• Pitches wrap every 32 MIDI notes, and every pitch on the Atari is playable
• MIDI Channel 2 for notes > 64 will trigger drum samples if instrument 0 is chosen.
Step-by-Step: A26F Interface
Parts needed:
• 2 x Atari 2600 or SEGA controller (for cable splicing)
• OR 2 x female DB9 connectors if you don't want to destroy perfectly good controllers! (recommended)
• Teensy 2 microcontroller
• 2 x Small strip / vero board
• 2 x 10 pin header (only 9 pins needed)
• USB A to mini B cable
• Atari 2600 console
• Atari 2600 programmable cartridge
• Breadboard, Breadboard jumpers
• Soldering iron, Solder, Soldering helping hands, Solder cleaner, Wire stripppers, Multi-meter

 2. Strip back the insulation for each of the nine wire cores.
 3. Tin each of the wires by adding a small amount of solder to the stripper back core of each wire.
 4. Turn the multi-meter to measure resistance in ohms.
 5. Connect one probe to the 9-pin connector
 6. Connect the other probe to a wire, and test each wire and match each wire to a pin number.
 7. In this case, it was as above. Note the shape and pin numbering of the connector.
 8. Take a small strip / vero board
 9. Using some wire strippers, cut the board to size, so that at least ten vertical strips are available.

 11. Solder the pin header in place.
 12.
Solder each of the wires to strip / vero board, so that pin 1 of the 9
pin connector is connected to pin 1 of the pin header, pin 2 to pin 2 of
the header and so on.
12.
Solder each of the wires to strip / vero board, so that pin 1 of the 9
pin connector is connected to pin 1 of the pin header, pin 2 to pin 2 of
the header and so on.


13. Repeat steps 1 - 12 so that there are 2 x pin header --> 9 pin connector cables
 14. Place one of the 9-pin header connector cables on the breadboard.
 15. Place the other the 9-pin header connector cables on the breadboard.
 16. Place the Teensy microcontroller on the breadboard.
 17. Connect ground on the Teensy to pin 8 of the left controller connector
 18. Connect Teensy digital pin 0 to pin 1 of the left controller connector
 19. Connect Teensy digital pin 1 to pin 2 of the left controller connector
 20. Connect Teensy digital pin 2 to pin 3 of the left controller connector
 21. Connect Teensy digital pin 3 to pin 4 of the left controller connector
 22. Connect Teensy digital pin 5 to pin 1 of the right controller connector
 23. Connect Teensy digital pin 6 to pin 2 of the right controller connector
 24. Connect Teensy digital pin 7 to pin 3 of the right controller connector
 25. Connect Teensy digital pin 8 to pin 4 of the right controller connector
 26. Connect Teensy digital pin 4 to pin 6 of the left controller connector
 27. Connect the breadboard to the Atari 2600
 28. Insert the programmable cartridge and make music!
Example Atari 2600 Cartridge:

Demo Videos
Demonstration of A26F interface
Sequencing and changing notes and instrument sounds
Sequencing drum samples and changing sample rate of playback
Quick Start Instructions
This post marks the release of the Atari 2600 MIDI (A26F) device, as well as the release of the A26F v100 firmware.
The code etc for this is open and free to use. Please do not commercialise this. It is not for making money. It is for making cool chiptune musics. I encourage you to build one of these. It is easy and shouldn't take long. I encourage you to hack the code and play and have fun with it. If you would like to make a batch of these available, please get in touch.
The aim of this post is to cover a simple hardware setup that can be used to create an A26F interface. This is achieved via an Atari Age 4K cartridge, a 2764 EPROM and a Teensy 2 microcontroller. Other methods are possible too.
- The A26F music interface relies on two pieces of firmware, one for a microcontroller and one for the Atari 2600 console.
- Download the firmware for the Atari 2600 console as a ROM here: http://little-scale.com/A26F/A26F_100/A26F_100_ROM.bin and as source code here: http://little-scale.com/A26F/A26F_100/A26F_Source_Code_6507.txt
- Upload the firmware ROM for the Atari 2600 console to a cartridge. Some suggestions on programmable cartridge solutions are made here:http://www.little-scale.blogspot.com.au/2013/03/current-options-for-atari-2600-user.html
- Download the firmware source code for the Teensy microcontroller here: http://little-scale.com/A26F/A26F_100/A26F_Teensy_100.ino
- Upload the firmware source code to the Teensy using the Arduino IDE (http://www.arduino.cc/) and the Teensyduino add-on (http://pjrc.com/teensy/teensyduino.html)
- Make a circuit with the following connections:
- Atari 2600 Player 1 Pin 1 ---> Teensy Port B0 (digital pin 0)
- Atari 2600 Player 1 Pin 2 ---> Teensy Port B1 (digital pin 1)
- Atari 2600 Player 1 Pin 3 ---> Teensy Port B2 (digital pin 2)
- Atari 2600 Player 1 Pin 4 ---> Teensy Port B3 (digital pin 3)
- Atari 2600 Player 1 Pin 6 ---> Teensy Port B7 (digital pin 4)
- Atari 2600 Player 1 Pin 8 ---> Teensy Ground
- Atari 2600 Player 2 Pin 1 ---> Teensy Port D0 (digital pin 5)
- Atari 2600 Player 2 Pin 2 ---> Teensy Port D1 (digital pin 6)
- Atari 2600 Player 2 Pin 3 ---> Teensy Port D2 (digital pin 7)
- Atari 2600 Player 2 Pin 4 ---> Teensy Port D3 (digital pin 8)
- The joystick pinout for the Atari 2600 can be found here: http://old.pinouts.ru/Inputs/JoystickAtari2600_pinout.shtml
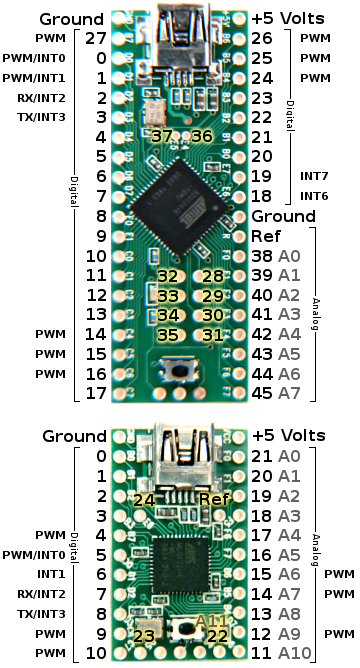
- The Teensyduino pinout can be found here: http://pjrc.com/teensy/wiring_pinout2.png
MIDI Mapping
• MIDI Channel 1 is Atari TIA Channel 1
• MIDI Channel 2 is Atari TIA Channel2
• Velocity is mapped to 16 steps of amplitude for each channel
• MIDI CC #1 sets the instrument type
• MIDI CC#11 can also set the volume (independent of the velocity)
• Pitches wrap every 32 MIDI notes, and every pitch on the Atari is playable
• MIDI Channel 2 for notes > 64 will trigger drum samples if instrument 0 is chosen.
Step-by-Step: A26F Interface
Parts needed:
• 2 x Atari 2600 or SEGA controller (for cable splicing)
• OR 2 x female DB9 connectors if you don't want to destroy perfectly good controllers! (recommended)
• Teensy 2 microcontroller
• 2 x Small strip / vero board
• 2 x 10 pin header (only 9 pins needed)
• USB A to mini B cable
• Atari 2600 console
• Atari 2600 programmable cartridge
• Breadboard, Breadboard jumpers
• Soldering iron, Solder, Soldering helping hands, Solder cleaner, Wire stripppers, Multi-meter
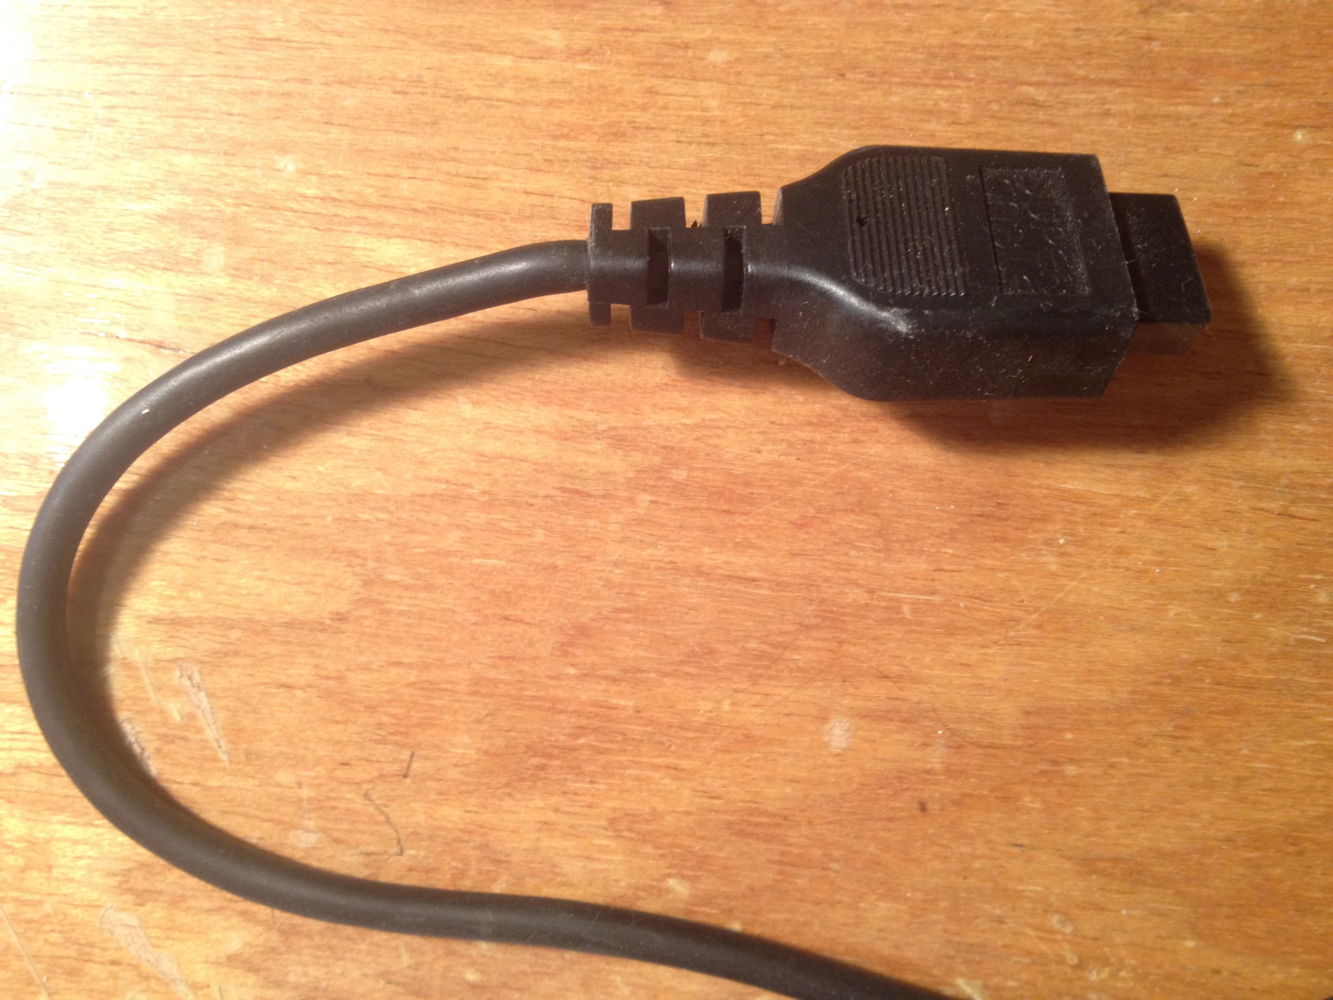
1. Take the Atari / SEGA controller and cut off the connector. Strip back the insulation.


10. Place the ten pin header in the board, so that each pin has its own vertical strip.


13. Repeat steps 1 - 12 so that there are 2 x pin header --> 9 pin connector cables


Example Atari 2600 Cartridge:

Atari Age 4K
Current Options for Atari 2600 User-programmable Cartridges
Here is a list of options for user-programmable Atari 2600 cartridges.
Harmony Cart: http://harmony.atariage.com/
Melody Cart: http://www.atariage.com/forums/blog/107/entry-6412-perfect-harmony/
DIY EPROM / EEPROM Cart: http://www.atariage.com/2600/faq/index.html?SystemID=2600#pinouts
AtariAge / PixelsPast EPROM Cart PCBs: http://www.atariage.com/features/shows/atariage_pc5/pixelspast.html
Krokodile Cart: http://www.atariage.com/software_page.html?SoftwareLabelID=2716
Cuttle Cart: http://www.schells.com/cuttlecart.shtml
Modified SuperCharger: http://www.biglist.com/lists/stella/archives/200203/msg00022.html
Modified VecFlash Cart: http://little-scale.blogspot.com.au/2006/08/at-last-loopcart-on-real-atari-2600.html
Harmony Cart: http://harmony.atariage.com/
Melody Cart: http://www.atariage.com/forums/blog/107/entry-6412-perfect-harmony/
DIY EPROM / EEPROM Cart: http://www.atariage.com/2600/faq/index.html?SystemID=2600#pinouts
AtariAge / PixelsPast EPROM Cart PCBs: http://www.atariage.com/features/shows/atariage_pc5/pixelspast.html
Krokodile Cart: http://www.atariage.com/software_page.html?SoftwareLabelID=2716
Cuttle Cart: http://www.schells.com/cuttlecart.shtml
Modified SuperCharger: http://www.biglist.com/lists/stella/archives/200203/msg00022.html
Modified VecFlash Cart: http://little-scale.blogspot.com.au/2006/08/at-last-loopcart-on-real-atari-2600.html
Wednesday, September 29, 2010
Download little-scale and Poppi Doser: Antia (2010) for Free!
Poppi and I really hope that you enjoy this one. It's a release of mine that I've been particularly happy with, and I think that Poppi brings something really special to the collaboration. Thanks for your patience!


"A recent project saw little-scale collaborate with electronic music composer and researcher Poppi Doser. Antia - the resultant eight track EP - is best described as ambient and smooth sonic landscapes, interrupted by harsh and rhythmically complex lo-fi beats.
A work of contradiction, Antia manages to create a convincing merger of various stylistic elements. Poppi provides field recordings, plays piano and sings, and little-scale is on the SEGA Mega Drive and Atari 2600."


"A recent project saw little-scale collaborate with electronic music composer and researcher Poppi Doser. Antia - the resultant eight track EP - is best described as ambient and smooth sonic landscapes, interrupted by harsh and rhythmically complex lo-fi beats.
A work of contradiction, Antia manages to create a convincing merger of various stylistic elements. Poppi provides field recordings, plays piano and sings, and little-scale is on the SEGA Mega Drive and Atari 2600."
Thursday, July 08, 2010
little-scale: Glass Eater (2010) - Music For One Atari 2600

An EP featuring music for one Atari 2600.
Download 'Glass Eater' here: http://www.milkcrate.com.au/littlescaleweb/glass_eater.zip
Friday, June 18, 2010
little-scale and Poppi Doser: Antia (2010)
"A recent project saw little-scale collaborate with electronic music composer and researcher Poppi Doser. Antia - the resultant eight track EP - is best described as ambient and smooth sonic landscapes, interrupted by harsh and rhythmically complex lo-fi beats.
A work of contradiction, Antia manages to create a convincing merger of various stylistic elements. Poppi provides field recordings, plays piano and sings, and little-scale is on the SEGA Mega Drive and Atari 2600."
Finally, Antia is out! I am very happy with this release, and consider it some of my best material. Coinciding with our performance at the 2010 NIME conference in Sydney, 8bitpeoples is stocking the release as a CD. Quanities are limited, so be quick! Grab it here:
https://www.8bitpeoples.com/store/product/80
Wednesday, May 05, 2010
Racing The Beam (A Book About Atari 2600)

I have finally received a copy of the book Racing The Beam: The Atari Video Computer System by Nick Montfort and Ian Bogost. I am expecting it to be quite a good read. More information about this publication can be found here.
Sunday, April 25, 2010
New Track on 8BC and Chipmusic.org "I Am Still Breathing"
For SEGA Nomad and Atari 2600. http://8bitcollective.com/music/little-scale/I+Am+Still+Breathing/
Sunday, January 31, 2010
little-scale: Office Yoga Made Easy

Office yoga made easy; hypnosis for the modern age. Music for SEGA Nomad and Atari 2600. Cure yourself with electricity.
Track listing:
1. We Are Eating Our Children
2. Four-Wheel Drive Advertisement
3. Plus One
4. Self Replicating Technology
5. Latitude and Longitude (CD-only track)
6. Microbiology
You can download this release here. You can also purchase a physical copy of this release here. Why would you want to do that? Well, (1) you might like to support what it is that I do (2) it's only $4 plus postage and (3) it contains an extra track.
The artwork contains elements by the Flickr user O'hAodha. Used under license.
Thursday, January 28, 2010
4KB 27C256 Device Atari 2600 Cartridge
I received some blank Atari 2600 PCBs in the mail today from the delightful Albert Yarusso. Doesn't the purple look nice? These carts are 4K carts and are made to use 27256 / 27C256 devices (which are actually 32KB) instead of the less common and more expensive 2732 / 27C32 (4KB).


Wednesday, January 20, 2010
A26F Atari 2600 MIDI Interface Update
I have added an 'oversampling' routine for the A26F, which allows for high speed / pitched playback of samples. Basically, it means that one can get more variety out of the small amount of sample space available.
Friday, October 16, 2009
Friday, August 14, 2009
Tuesday, July 21, 2009
Atari 2600 Percussive Creative Commons Sample Pack
This Sample Pack by Sebastian Tomczak is licensed under a Creative Commons Attribution-Noncommercial 3.0 Unported License. More information about this license can be viewed here: http://creativecommons.org/licenses/by-nc/3.0/
This sample pack features 28 short percussive samples recorded from an Atari 260 Jr PAL console. Previously, people have requested dry, direct recordings of these samples as a pack - this is why the pack is being posted.
Download it here.
This sample pack features 28 short percussive samples recorded from an Atari 260 Jr PAL console. Previously, people have requested dry, direct recordings of these samples as a pack - this is why the pack is being posted.
Download it here.
Subscribe to:
Posts (Atom)