

Showing posts with label pixel point. Show all posts
Showing posts with label pixel point. Show all posts
Tuesday, May 13, 2014


Friday, January 11, 2013
Convert Pixel Points to MIDI CC: Video Tutorial
Download Suckahd here: http://little-scale.blogspot.com.au/2013/01/convert-pixel-points-to-midi-cc-suckahd.html
Convert Pixel Points to MIDI CC: Suckahd Update
Some people have asked me how I made this video:
The answer is with this patch.

Suckad lets do grab colour data from pixels and map it to MIDI CC.
// FEATURES //
- 8 pixels
- 4 colour channels per pixels (R, G, B, Grayscale)
- MIDI CC data output for all 4 colour channels
- Custom, quick placement of pixel positions
- Parameter fading with grain control
Download here: http://milkcrate.com.au/_other/downloads/max_patches/suckad.zip
// USAGE //
PART A: SET UP PIXEL POSITIONS
- Make sure this window is active
- Move the mouse to wherever the first pixel point is that should be converted to MIDI CC
- Press the keyboard number 1
- Repeat for keyboard numbers 2 - 8
PART B: SET UP COLOUR CHANNEL MIDI MAPPINGS
- For each pixel, the R, G, B and Grayscale values are sent as MDI CC values
- For each colour channel, the raw value of 0. - 1. is scaled in full from 0 - 127 for MIDI CC
- For pixel #1, MIDI CC 1 is used for Red,
- For pixel #1, MIDI CC 2 is used for Green
- For pixel #1, MIDI CC 3 is used for Blue
- For pixel #1, MIDI CC 4 is used for Grayscale
- For pixel #2, MIDI CCs 5 - 8 are used
- For pixel #3, MIDI CCs 9 - 12 are used and so on
- Each colour channel / MIDI CC can be muted so as to make setting up MIDI mappings easy!
- To mute a colour channel, simply move the appropriate slider from the ON position to the OFF position
PART C: PARAMETERS
- Parameter fades: set the fade length to move from one parameter value to the next
- Parameter fade grain size: set the increment size in ms of the fades
- Pixel polling rate: set how often the eight pixels are polled for their colour data
- MIDI output device: set the output device
The answer is with this patch.

Suckad lets do grab colour data from pixels and map it to MIDI CC.
// FEATURES //
- 8 pixels
- 4 colour channels per pixels (R, G, B, Grayscale)
- MIDI CC data output for all 4 colour channels
- Custom, quick placement of pixel positions
- Parameter fading with grain control
Download here: http://milkcrate.com.au/_other/downloads/max_patches/suckad.zip
// USAGE //
PART A: SET UP PIXEL POSITIONS
- Make sure this window is active
- Move the mouse to wherever the first pixel point is that should be converted to MIDI CC
- Press the keyboard number 1
- Repeat for keyboard numbers 2 - 8
PART B: SET UP COLOUR CHANNEL MIDI MAPPINGS
- For each pixel, the R, G, B and Grayscale values are sent as MDI CC values
- For each colour channel, the raw value of 0. - 1. is scaled in full from 0 - 127 for MIDI CC
- For pixel #1, MIDI CC 1 is used for Red,
- For pixel #1, MIDI CC 2 is used for Green
- For pixel #1, MIDI CC 3 is used for Blue
- For pixel #1, MIDI CC 4 is used for Grayscale
- For pixel #2, MIDI CCs 5 - 8 are used
- For pixel #3, MIDI CCs 9 - 12 are used and so on
- Each colour channel / MIDI CC can be muted so as to make setting up MIDI mappings easy!
- To mute a colour channel, simply move the appropriate slider from the ON position to the OFF position
PART C: PARAMETERS
- Parameter fades: set the fade length to move from one parameter value to the next
- Parameter fade grain size: set the increment size in ms of the fades
- Pixel polling rate: set how often the eight pixels are polled for their colour data
- MIDI output device: set the output device
Thursday, January 10, 2013
Tuesday, January 08, 2013
Friday, January 04, 2013
Suckad: Pixel Point RGB Grey to MIDI CC Data

A simple Max patch that converts RGB and Grey pixel point data.
Download here: http://milkcrate.com.au/_other/downloads/max_patches/suckad.zip
Sunday, October 07, 2012
PixelPoint - Max for Live Device


This Max for Live MIDI effect device and Max patch takes a single point on the screen (chosen via the mouse position and then pressing the '1' key on the computer keyboard). This pixel point is then mapped to pitch and velocity in terms of MIDI note event generation.
Max for Live performance VS Max performance:
This device / patch works much better as a standalone Max patch. I think that the reading of the disaply pixels via the Suckah object is interfering with some Live audio functions if the device is running as a Max for Live device as opposed to running as a standalone Max patch. You can compare the performance of both in the following two videos.
Download the Max for Live device: http://milkcrate.com.au/_other/downloads/M4L/little-scale.PixelPoint.amxd
Download the Max patch: http://milkcrate.com.au/_other/downloads/M4L/little-scale.PixelPoint.maxpat
Max for Live Device version:
Max Patch version:
Wednesday, December 22, 2010
glitchNES As Audio Controller / Glitch Music Remix Tool

I thought it might be fun to use No Carrier's glitchNES as a tool to remix and control audio. I used a Max/MSP patch that I made quite a while ago to grab pixel colour data from 16 pixels across glitchNES' visual output. Each pixel sends its greyscale data as well as red, green and blue data as a MIDI control change value every 40 ms. This makes for 64 streams of MIDI data, which are then used to manipulate 16 copies of the same song, in terms of loop start point, loop length, filter frequency and volume. Let me know if you want a copy of the Max/MSP patch etc.


Tuesday, May 26, 2009
Visual Effects as Audio Effects
Background
I wanted to use visual effects such as blurs, colour transformations and pinches as audio effects instead of visual effects.
Overview
I wrote a simple Max/MSP patch to help me out with this task. The idea is quite simple. The patch works in two phases. The first phase is to open up an audio file (of up to 8. 163 seconds in length). The patch then converts each individual audio sample into a pixel in an image of 600 by 600 pixels (this equals 360,000 samples), and saves off this image as an image file.
Each pixel represents the audio with a quality of up to 24 bits, spreading the information evenly over the three colour bands of red, green and blue like this:
This image file can then be manipulated in an image editing program such as Photoshop. I have done all of my editing using Graphic Converter. The edited image can then be opened in the Max/MSP, which reads each pixel and converts it back to an audio file.
Max Patch
Download the patch here. Below are all of the screenshots of the Max/MSP patch.
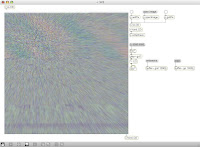
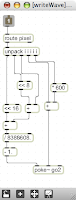
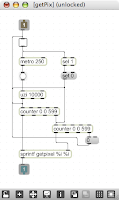
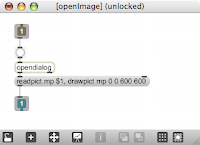
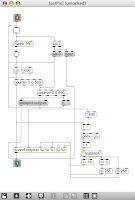
Outcomes

I wanted to use visual effects such as blurs, colour transformations and pinches as audio effects instead of visual effects.
Overview
I wrote a simple Max/MSP patch to help me out with this task. The idea is quite simple. The patch works in two phases. The first phase is to open up an audio file (of up to 8. 163 seconds in length). The patch then converts each individual audio sample into a pixel in an image of 600 by 600 pixels (this equals 360,000 samples), and saves off this image as an image file.
Each pixel represents the audio with a quality of up to 24 bits, spreading the information evenly over the three colour bands of red, green and blue like this:
COL: RED
BIT: MSB 23 22 21 20 19 18 17 16 LSB

COL: GREEEN
BIT: MSB 15 14 13 12 11 10 09 08 LSB

COL: BLUE
BIT: MSB 07 06 05 04 03 02 01 00 LSB
This image file can then be manipulated in an image editing program such as Photoshop. I have done all of my editing using Graphic Converter. The edited image can then be opened in the Max/MSP, which reads each pixel and converts it back to an audio file.
Max Patch
Download the patch here. Below are all of the screenshots of the Max/MSP patch.


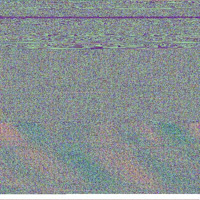
Outcomes
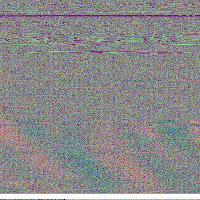
Here are some resulting waveforms with their corresponding images. Naturally, the images have been compressed to be uploaded onto the web so there might be some artifacts not visible in the original, uncompressed versions.
Unedited audio (listen):
Gaussian Blur (listen):


Friday, May 15, 2009
Magic Pixie


Years ago I made a little program for Max/MSP as part of my undergraduate degree that uses an image as a score and "plays" it pixel by pixel and feeds the data into a synthesis engine. It was fun to make and use, and I played it at the end of year performance that year. The patch was worth it because as a result a got a permanent exhibition at the (now deceased) Science and Technology Investigator Centre as well as a workshop presentation in Michael Yuen's Project 2 sonic art event.
Today I have revisited this idea with a "new" version of the patch. The images above are "Mandala 10" and "Mandala 11" by the 8bitcollective.com user Campbell. These images were used as data sources in two of my 30 Songs in 30 Days.
This version of Magic Pixie reads a picture in blocks of 4 x 4 pixels, starting in the top left hand corner of the image and working down and right in collumns. Each pixel is stripped down to its RGB components. These values are scaled and fed to Live as MIDI data. Each of the four collumns that are read at a given point in time represents a voice that has a Sega Master System sample loaded into an instance of the Simpler sampling plugin.
Below is the list of MIDI mappings in Live. Naturally, the data could have been used to control an actual Sega Master System, but I do not have one with me today unfortunately.

Thursday, January 03, 2008
Bitterheart [four images remix]

"A visual (pixel-by-pixel) based remix of the Drowning Goldfish track 'Bitterheart'.
The track was originally written by David G A visual (pixel-by-pixel) based remix of the Drowning Goldfish track 'Bitterheart'.
The track was originally written by David Gustafsson and performed by David Gustafsson, Sebastian Tomczak and Brent Easson."
URL: http://www.youtube.com/watch?v=ao_6HlzFAeU
Wednesday, January 02, 2008
pixelScale

Identical to pointScaleCC except that the pixels are predetermined and allow the user to 'read' through an image and convert the image into MIDI CC data. Sixteen pixels are read at once, giving a lot of 64 points of CC data over 64 controller values.
pointScaleCC

Very similar to pointScale except that the patch sends midi CC data instead. Each of the sixteen pixels sends grayscaled data, red data, green data and blue data (therefore a total of 64 streams of CC data are sent). The controller numbers are predetermined. The channel and device are set globally. Each controller output can be muted or made active.
Additionally, the patch contains an array of 16 'testing' areas where the effects of various colours can be easily tested.
Video Feedback to Sound Control
 Sound control was performed in real time using specific pixel-point analysis to MIDI continuous control conversion, which was fed into Ableton Live.
URL: http://www.youtube.com/watch?v=zcgtOg26RIU
Tuesday, December 11, 2007
pointScale (update)
 I have added a number of features to the pointScale patch.
- 16 instances (up from 8).
- Reacts to the amount of red, green and blue that comprises the pixel as well as the grayscale equivalent:
- The amount of red sets the volume of the square wave component. The more red, the louder the square wave is.
- The amount of green sets the volume of the white noise component. The more green, the louder the white noise is.
- The amount of blue sets the volume of the sine wave component. The more blue, the louder the sine wave is.
- Grayscaled RGB data then set the overall output volume for the three components per pixel per instance at a given frame in time.
- Individual muting function for unwanted instances (saves computing power).
- Global muting function for all instances.
- Global setting of exponential scaling of the volume control function.
- Global setting of a lower volume threshold, to stop unwanted tones and noise from playing.
- Global setting of a noise volume linear scale. This adds a stronger sense of correlation between darker colours and softer volumes (corresponding a little more closely with the way in which humans perceive volume).
- Global volume output meter.
- Global volume output level control.
- A colour test section with which to test the effects of various RGB values with settings.


Monday, December 10, 2007

pointScale

Similar to pointThresh, except that grayscale RGB data is used to control continuous audio parameters directly. The response is pretty good, considering. However, the audio side of things will have to be developed further.

Subscribe to:
Posts (Atom)

