Showing posts with label water music. Show all posts

Monday, April 20, 2009

Schematics and Patches and Code for Toriton Plus


If you want to build your own Toriton Plus water instrument, you can find a good amount of information here.


You will need:
- A computer with Max 5 or Max 5 runtime installed, a spare USB port and an audio card
- This patch for Max 5 or Max5 runtime (download here)
- An Arduino board and an Arduino IDE for your computer
- This sketch for the Arduino board and IDE (download here)
- Red 1mW lasers x 5
- LDR 100kΩ - 1MΩ x 5
- 100kΩ resistors x 5
- 22kΩ resistors x 3
- 500kΩ pots x 5
- A clear bowl or cake dish (I bought one for $20 from my local HomeBasics retail store, however if this is too expensive I have seen equally suitable vessels in antique stores and discount variety stores)
- Some way of mounting the lasers so that they are pointing diagonally through the clear vessel onto the LDRs
- You might need a suitable table or if you want to be fancy you can build all your electronics, sensors and mounting equipment into the table like me
- Some water
- Please note that the Toriton is powered by the USB cable going from the computer to the Arduino board


Hardware Setup:


How to wire the keypad:

The idea of the digital scanning of a keypad is very simple. The keypad in question has twelve buttons, set up in four rows of three (like a phone keypad, for example). Each button has two connection points – one point goes to a row pin, and one point goes to a column pin. Therefore, seven pins are connected between the keypad and the Arduino – four for the rows and three for the columns. When a button is pushed, it connects the two points – a column pin and a row pin.

By setting a row pin ‘high’ (in this case, to 5V as opposed to ground which would be considered ‘low’), and reading the digital state of the columns, and then repeating this process for the four rows, it is possible to see which button on the keypad is pressed at a given point in time.

The hardware setup is very simple – only the keypad and three 22kΩ resistors are required. Connect Arduino digital i/o pins 2 to 8 to the keypad. Pins 2 – 5 are for rows 1 – 4 respectively and pins 6 – 8 are for columns 1 – 3 respectively. Connect each of pins 6 – 8 to ground via a 22kΩ each.


How to wire the LDRs and pots:
Of course, you will most likely want to use a more permanent solution than a breadboard. Each resistor is 100k. Each pot is 500k. Each LDR is 1MΩ in the dark.

Finally, each laser can be powered from the Arduino's 3.3V output.


How to use the Max/MSP patch:
Basic Use:
- Make sure your serial port A is your Arduino port
- turn the DAC ON
- make sure data is coming in (the multisliders should move)
- set your max point in the data (ie. move the water around after having toggled the max toggle). untoggle the max toggle
- set your max point in the data (ie. make the water still and then toggled the min toggle). untoggle the min toggle
- press keypad keys 1 to 5
- set the exp factor to between 1 and 1.09
- turn up the gain


Max Patch Customisation:


- Each of the ampy objects outputs scaled and interpolated data from its right outlet. Should you wish to use this data for other processes besides the built in synthesis, simply take this data output and scale it and send it to your other process (eg. scale between 0 and 127 for MIDI, 0 and whatever for OSC etc).


- Change the serial port letter from a to something else if your Arduino board uses a different port assignment
- Set the arg for speedlimFive lower should you wish to have a quicker response from the data.
- The rest of the patch is quite messy but if you have any specific questions, please ask me.


Saturday, January 17, 2009

Water-based Chipmusic (Literally)


The Toriton water music controller is controlling the SEGA Mega Drive soundchip inside the SEGA Mega Drive in real time. I have thought about doing this for quite a while, but this is my first actual realisation of anything that is both water music and chipmusic. The mapping is not complete or perfect yet by means, however it's an okay start.

Monday, January 12, 2009

Toriton Water Music Instrument Controlled by Wind!


I have made a video of my Toriton water-based music controller being controlled by the wind.

Wednesday, November 12, 2008

TechFest 2009: Mumbai, India

I am presenting and exhibiting in Mumbai, India at the 2009 TechFest. Expect to see the Toriton water-based instrument in my exhibit as well as other musical tools and devices. Thanks to Edul Patel and the rest of the TechFest 2009 management team.

"Techfest, the Annual International Science and Technology Festival of IIT Bombay, is proud to bring to you its twelfth edition. From nerve-racking Competitions to Lectures by noted luminaries, from incredible Workshops to fun-filled Ozone, Techfest 2009 will have everything to conquer your imagination. And just when you thought it couldn't get any bigger, it also happens to be the Golden Jubilee year of our illustrious institution."

Dates: 24 - 26 January 2009
Venue: IIT Bombay
More information: http://techfest.org/home/

Thursday, August 21, 2008

Pictures from Science Week


Tuesday, August 19, 2008

MIDI Soft / USB FTDI Hard with Arduino


For the Toriton upgrade, I decided to use a USB connection to the host computer, mainly because
this allows for both the Arduino and the lasers to be powered via the one connection as well as sending data.

In terms of software and protocol, though I am using MIDI (in terms of what the Arduino is sending to Max/MSP). Then, the serial object is connected to a midiout object to simulate a MIDI hardware interface. It works well in this situation (it has been running for three days without any issues).

If I had the time I probably would have made my own protocol and remade the entire Max/MSP patch, but as always... there's never enough time.

Saturday, August 16, 2008

How To Read A Keypad with Arduino


For the recent upgrade to the Toriton, I used a digital method and an Arduino board to ‘scan’ the twelve-button keypad (0-9, *, #). Previously, I had used a set of resistors acting as an array of interconnected voltage dividers, all going to a single analog input to read. Of course, this ‘analog method’ of reading the keypad is annoying to build, use and program, but it is a situation where I just didn’t know any better at the time, and used the resources and skills available to me back then.

The idea of the digital scanning of a keypad is very simple. The keypad in question has twelve buttons, set up in four rows of three (like a phone keypad, for example). Each button has two connection points – one point goes to a row pin, and one point goes to a column pin. Therefore, seven pins are connected between the keypad and the Arduino – four for the rows and three for the columns. When a button is pushed, it connects the two points – a column pin and a row pin.

By setting a row pin ‘high’ (in this case, to 5V as opposed to ground which would be considered ‘low’), and reading the digital state of the columns, and then repeating this process for the four rows, it is possible to see which button on the keypad is pressed at a given point in time.

The hardware setup is very simple – only the keypad and three resistors are required. Connect Arduino digital i/o pins 2 to 8 to the keypad. Pins 2 – 5 are for rows 1 – 4 respectively and pins 6 – 8 are for columns 1 – 3 respectively.

Thursday, August 14, 2008

Toriton Version 1.5

My Toriton water surface instrument has received a much needed upgrade.

Many thanks to Matthias Tomczak for his help with this.

The new version will be part of the Science Week exhibit at the South Australian Museum.


Friday, August 01, 2008

I'm in Popular Science Magazine!

There is a small section about the Toriton in the current issue (August 2008) of Popular Science Magazine.

Wednesday, February 13, 2008

Toriton @ Stanford University

Abel Allison of Stanford University has constructed a Toriton water-based musical interface.

Tuesday, December 11, 2007

An outdoor toriton

The investigation has begun.


Thursday, November 01, 2007

Toriton @ UNCG

Thomas Royal of the University of North Carolina at Greensboro in the U.S. will be performing a piece that includes the Toriton as part of his PhD portfolio as well as for submissions to various computer music conferences. The piece will also feature two controllers that Royal has designed and built.

Monday, July 23, 2007

... a little bit more


I worked on the standalone Toriton hardware a little bit more yesterday. The breadboard is looking a little less clustered. I still have to massage the data and maths quite a lot more, though.

Thursday, July 19, 2007

... a beginning

In order to try and take a break from cleaning the house, i decided to get serious in designing and building a standalone Toriton instrument.

The hour that i breadboarded, prototyped, coded and tested was well spent. The outcome was far more positive than i could have anticipated. This warrants further investigation.

The prospect of getting the Toriton away from the host computer system is something that has intrigued me for a long time. This is a beginning.

Monday, June 18, 2007

Driving to ACMC07 today

The time is 12:14 am. Luke Harrald, Derek Pascoe and myself are driving up to Canberra today. Seems like it will take a while. We leave in less than six hours.

I added a small enhancement to the Toriton Plus (which is coming with us to ACMC07). It is a laminated piece of paper that covers the electronics. Wouldn't want to get water in there, now would we. Here you can see Kira the cat enjoying the instrument.

My old pipette was destroyed after a show last year, so today i bought a new one. My choices in colour were either yellow or pink. So i bought the yellow one. I tried it out earlier and it was very suitable for performance.

Wish me luck!

Wednesday, May 30, 2007

Tomczak on the radio: downloadable content!

You can download the relatively recent story on milkcrate that aired on ABC Classic FM here. This version is not the one that aired and i believe it is closer to what Alice Keath intended.

You can download my interview with Nick Rusk of Radio Adelaide here. It is concerned with YouTube and Toriton.

Thanks to Alice and Nick for these files.

Wednesday, January 31, 2007

An analog toriton, part 1

I am planning to make a completely analog version of the toriton plus instrument. As such, i want it to be cheap to build and not need a computer for standalone operation.

The first stage of this process will be to find and build a suitable sine wave audio generator. When i say 'suitable' i mean 'cheap and easy to make'. So i built this very basic 1khz test generator where the components minus wiring and board cost $1.30 (probably cheaper if buying online in quantity). It has quite a bit of noise which will need to be filtered out, but the sine wave itself seems to be relatively pure considering the cost...

In order to turn this into a tune-able generator, i think the two resistors on the right need to be replaced by a twin pot in series with two small resistors. But i haven't tried this out yet...

This project is one that will take some time to get off the ground. However, it will be worth it.

Wednesday, January 10, 2007

The Advertiser: "Tomczak is an intense young man..." ;-)

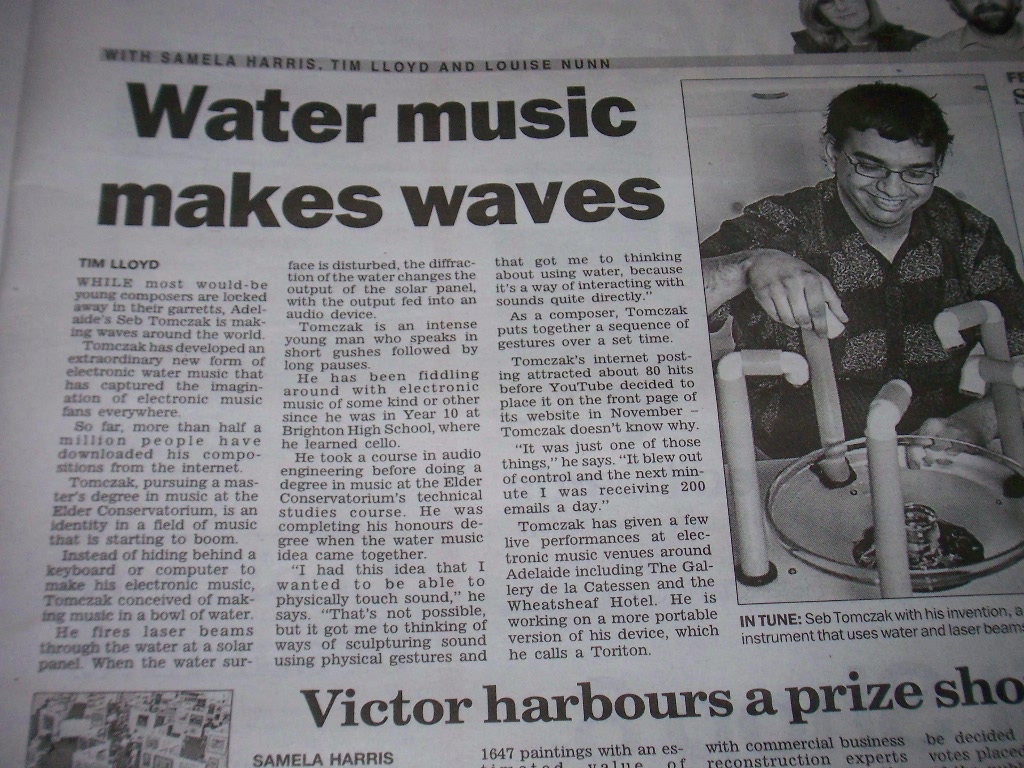
An article mainly about the Toriton Plus instrument as well as a little about me has been printed in todays Advertiser on page 27. They even have a 'charming' photo of yours truly.

Read the online version here.

Monday, January 08, 2007

Fixing the Toriton Plus

For an article and a picture for The Advertiser, I had to fix up the Toriton Plus to be a tad more photogenic. Three of the 'turrets' had fallen off or been put out of place due to excessive car travel (where the instrument has to lay on it's side). The article should be coming out either next wednesday or the following one int the arts section.

More photos here.

Saturday, December 16, 2006

By "popular demand"... (Your Ego is) The Size of Mountains

Okay, so I have had one request for this track. But hey, at least someone was interested. I hope that they are not disappointed... BTW, this is one of the creative works for my honours project. Download the audio here (10MB MP3).

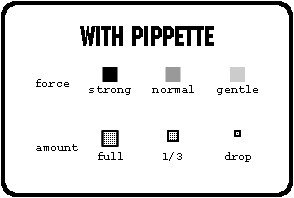
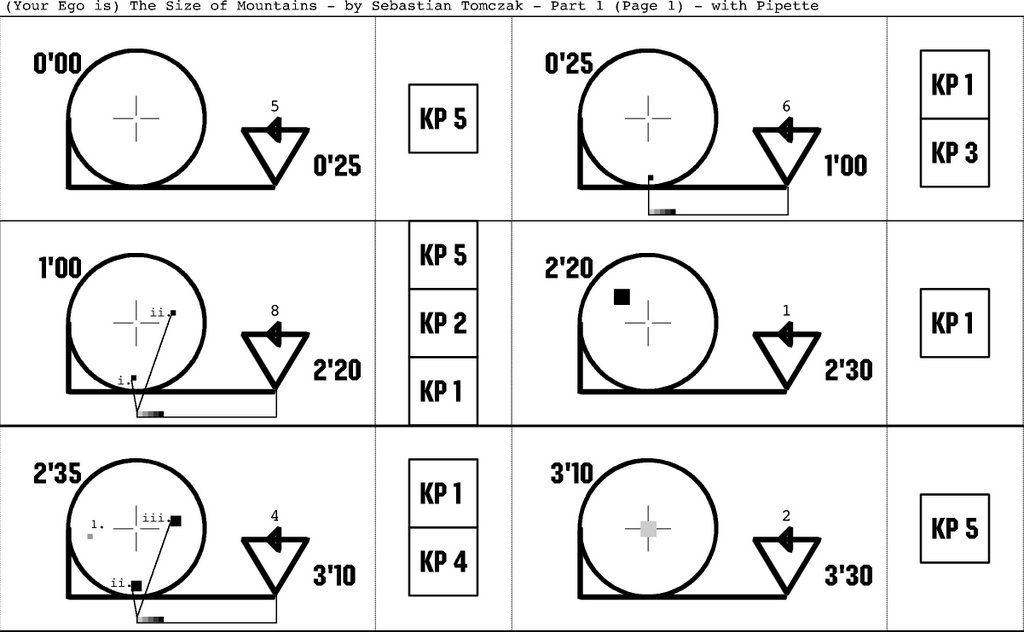
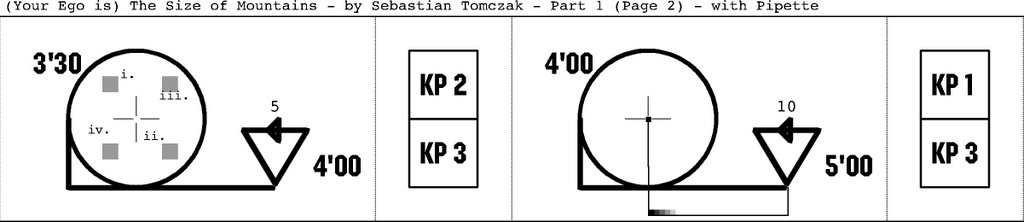
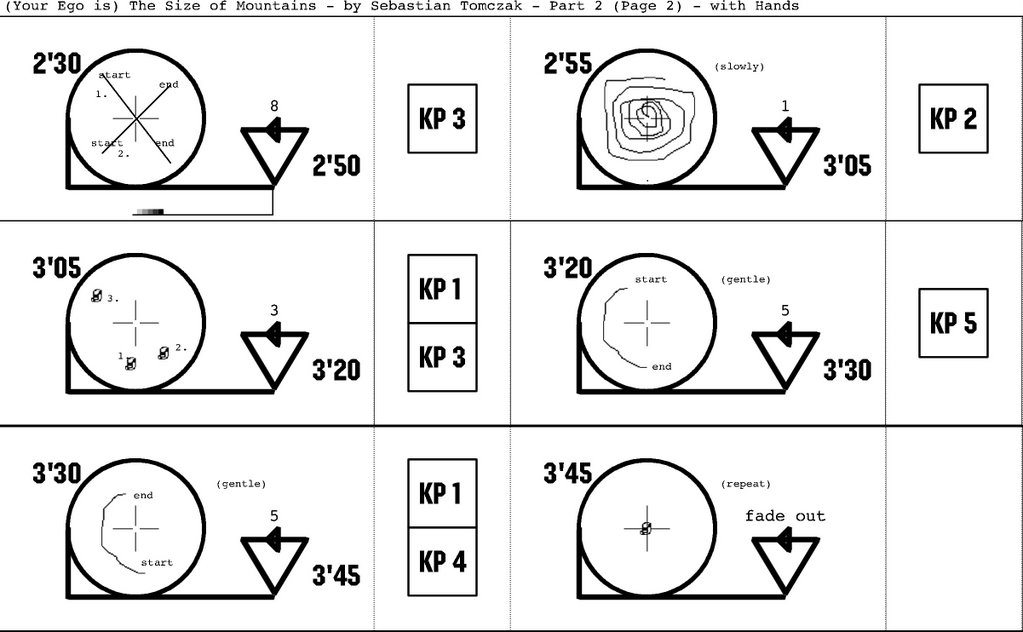
Program Note and Graphical Instruction Set
The piece titled ‘(Your Ego is) The Size of Mountains’ is realized using the instrument Toriton Plus. This unique combination of software and hardware involves controlling sound events via the surface of water and offers a surprising degree of expression and sensitivity to the human performer. Lasers penetrating the water act as a measuring point. When the surface moves, so does the angle at which the lasers pass through the water. This results in a measurable change in physical state. One aim of the instrument is to create a close relationship between the physical events occurring and the sound output material. The work can be best described as a sound sculpture, as this term emphasises the manipulation of a physical medium to conjure a creative result.

‘(Your Ego is) The Size of Mountains’ is comprised of two parts. The first is played with a pipette and the second is performed using bare hands only. Both sections display unique yet repeatable playing techniques. Although non-narrative in nature, the work is somehow reminiscent of a fictional pre-industrialised, agriculture-based society. It should be noted that in a very real sense, being so closely related to the movement of the water surface creates a sonic outcome that delivers a strong impression of water as a concept or an idea. Simple additive synthesis is used in order to map a gradual response to the sound output, resulting in distinct timbral changes over time. Only sinewaves in the key of A minor and their harmonics have been employed.

Notation for the instrument Toriton Plus is achieved via a graphical instruction set. Although the concept of this method can be considered similar to a standard musical score, it must be noted that it cannot be regarded as such. This is due to the variance in sound output when listening to multiple performances of the same work.

The graphical instruction set is divided into a number of gesture partitions. Each partition indicates one or more actions to be performed by the player and a time period in which they are to be performed. Section One (pages 1-2) are to be performed using the pipette technique. Section Two (pages 3-4) are to be performed using the bare hand.