Showing posts with label diy. Show all posts

Sunday, May 10, 2026

MPXV7002 as Breath Sensor

Breath sensor made from an MPXV7002 and a silicon tube. The tube has incisions added near the breathing end to allow air to flow through while still building pressure at the sensor end. Enough pressure is still built up within the tube to allow circular breathing if desired. The sensor sends note on / off and continuous control data.

To improve this I might consider a wider tube that is coupled with the sensor or try more or different-sized puncture holes or a 3D printed mouthpiece. However, it still works really well as-is.

Wiring is simple as the sensor outputs an analog voltage and works fine on 3v3 or 5v power supply. The output voltage is rail to rail across the power supply voltage range, and can represent both positive and negative pressure, meaning that the neutral pressure will output at halfway of the voltage supply.

For a Teensy 3.x or 4.x: 3v3 to the 5V pin on the sensor, ground to ground and output of the sensor to Teensy A0 analog input pin.


Here is some code as an example: 


int air_pin = A0;
int air_pressure;
int air_pressure_prev;
int breath_controller = 1;

int threshold = 75;
int play_flag = 0;

int channel = 1;
int pitch = 60;
int velocity = 127;

void setup() {
Serial.begin(57600);
usbMIDI.read();
}

void loop() {
air_pressure = analogRead(air_pin) >> 3;
if(air_pressure != air_pressure_prev) {
air_pressure_prev = air_pressure;
usbMIDI.sendControlChange(breath_controller, air_pressure, channel);
Serial.println(air_pressure);
delay(10);
}

if(air_pressure > threshold && play_flag == 0) {
usbMIDI.sendNoteOn(pitch, velocity, channel);
Serial.println("note on");
play_flag = 1;
}

if(air_pressure < threshold && play_flag == 1) {
usbMIDI.sendNoteOff(pitch, 0, channel);
Serial.println("note off");
play_flag = 0;
}

}


Sunday, March 10, 2024

Pyramid Controller


My pyramid controller is almost identical to my sphere controller. The difference in shape means that each side feels a little like a preset, and its easier to have an intuition about rotation and orientation compared to a sphere. The code is slightly different as it doesn't adjust brightness; this looks better in my opinion. The code and model files can be found here: https://github.com/little-scale/Music-Sphere-Controller alongside a Max patch that makes it easy to get the data from the pyramid. The board will transmit x y and z data streams for acceleration, gyroscope and magnetometer. The acceleration values determine the colour of the onboard LED. Printing in white or clear PLA makes the colour shine through nicely. 

Thursday, November 30, 2023

Printable Variable Miniskiff


I've added a variable miniskiff part studio to the Eurorack case document: https://cad.onshape.com/documents/1637ca71f6ccbf900471de5e/w/ba5b8495e9753650883d1cb0/e/c3f73f4b0fd00e64b5823644?renderMode=0&uiState=656884e93534192f492a1c3b 

This part studio has variables for many aspects of the case including the width in HP. 46 HP is the widest case that will print on a 25 cm 3 volume printer like the Bambu P1P

Tuesday, May 09, 2023

Musical Sphere Controllers


I made some musical sphere controllers. They use the Adafruit Feather Sense BLE nRF5284 board. Axis in six dimensions can be mapped to MIDI outputs via a Max patch. Details including code, patch and 3D files can be found in the github repo here: https://github.com/little-scale/Music-Sphere-Controller 

Wednesday, April 19, 2023

Simple Cinemag CM-DBX Transformer DI

I wired up a simple DI for my synths as I wanted to balance the output as well as push the signal through a transformer. I used a Cinemag CM-DBX transformer. 


I connected the primary coil (yellow for positive and orange for negative) to the 6.5mm mono socket, as well as the chassis of the primary coil and shield of the transformer to 6.5mm ground. I connected the secondary coil (red for positive - XLR pin 2 and brown for negative - XLR pin 3) to the XLR jack, as well as the chassis of the secondary coil to XLR pin 1 (ground)ses Cinemag CM-DBX for the transformer, 

I used Jaycar part PP1023 for the XLR jack and Jaycar part PS0162 for the 6.5mm mono socket. Even though the box is plastic I have not had any noise issues yet but this will depend on environmental conditions. 

No issues with modular levels going through the transformer so far! So it can handle pretty hot signals. 

Download the STL files here: https://www.thingiverse.com/thing:5979053 

Teensy 4.1 with QMC6310 Magnetometer to USB MIDI

Overview

The QMC6310 magnetometer sensor outputs 16 bit for each axis X, Y and Z. The code uses the Wire library to communicate via the I2C protocol. This example prints the raw axis values to the serial monitor and also sends as a USB MIDI control change message (scaled to 0 - 127). The datasheet for this sensor can be found here. 


Hardware


The following connections should be made between the Teensy 4.1 and the QMC6310:
  • Teensy 4.1 3V to QMC6310 VCC - orange in the above photo
  • Teensy 4.1 ground to QMC6310 GND - blue in the above photo
  • Teensy 4.1 pin 19 / A5 / SCL / PWM to QMC6310 SCL - green in the above photo
  • Teensy 4.1 pin 18 / A4 / SDA / PWM to QMC6310 SDA - yellow in the above photo


Software

const int address = 0x1c; // 0x1c if part number is QMC6310U or 0x3c if part number is QMC6310N
int16_t axis[3]; // array for axis data X, Y, Z - force 2's compliment for a signed 16 bit integer

#include <Wire.h>

void setup() {

// Begin serial port
Serial.begin(57600);
Serial.println("Begin...");

// Begin Wire library
Wire.begin();

// set up magnetometer
// writeMag(0x29, 0x06); // define sign for XYZ
writeMag(0x0b, 0x00 | 0x01 << 2); // define set / reset on
// field range: 2gauss = 0x11 << 2, 8gauss = 0x10 << 2, 12gauss = 0x01 << 2, 30guass = 0x00 << 2
writeMag(0x0a, 0xcd); // set normal range and ODR to 200 Hz
}

void loop() {
if (readMag()) { // if there is new data present, print the values of the three axis as a sixteen bit value
Serial.print("X: ");
Serial.print(axis[0]);
usbMIDI.sendControlChange(1, map(axis[0], -32768, 32767, 0, 127), 1);
Serial.print(" Y: ");
Serial.print(axis[1]);
usbMIDI.sendControlChange(2, map(axis[1], -32768, 32767, 0, 127), 1);
Serial.print(" Z: ");
Serial.println(axis[2]);
usbMIDI.sendControlChange(3, map(axis[2], -32768, 32767, 0, 127), 1);
}
}

// this function writes data to the magnetometer
void writeMag(byte reg, byte val) {
Wire.beginTransmission(address);
Wire.write(reg);
Wire.write(val);
Wire.endTransmission();
}

// this function reads X,Y,Z data from the magnetometer
int readMag() {
// set reg 9 to read from
Wire.beginTransmission(address);
Wire.write(0x09);
Wire.endTransmission();

// read from reg 9 for 1 byte - this is the status byte
byte status; // status byte which stores the
Wire.requestFrom(address, 1);
while (Wire.available()) {
status = Wire.read() & 1;
}

if (status == true) {
// set reg 1 to read from
Wire.beginTransmission(address);
Wire.write(0x01);
Wire.endTransmission();
// read from reg 9 for 6 bytes - these are the data bytes X LSB, X HSB, Y LSB, Y HSB, Z LSB, Z HSB
Wire.requestFrom(address, 0x06);
byte index = 0;

// read data into axis array
while (Wire.available()) {
axis[index] = Wire.read() | Wire.read() << 8;
index++;
}
return true; // true if new data is present
}

else {
return false; // false if no new data is present
}
}

Friday, February 10, 2023

Simple Eight Pots Controller with Case


PCB, schematic code and 3D printing files here: https://github.com/little-scale/eightpots

Kicad Footprint Library for PS4 Joystick


I made a Kicad footprint for PS4 joysticks and an accompanying breakout board PCB. 

Download here: https://github.com/little-scale/PS4_joystick_footprint 


Code example - prints the X, Y and button values to the serial monitor


const int button = 24;
const int x = A11;
const int y = A12;

int button_current;
int button_previous;

int x_current;
int y_current;
int x_previous;
int y_previous;

void setup() {
Serial.println(57600);
analogReadResolution(8);
analogReadAveraging(100);
pinMode(button, INPUT_PULLUP);

}

void loop() {
button_current = digitalRead(button);
x_current = analogRead(A11);
y_current = analogRead(A12);

if(button_current != button_previous) {
button_previous = button_current;
Serial.print("button: ");
Serial.println(button);
delay(5);
}

if(x_current != x_previous) {
x_previous = x_current;
Serial.print("x: ");
Serial.println(x_current);
delay(5);
}

if(y_current != y_previous) {
Serial.print("y: ");
y_previous = y_current;
Serial.println(y_current);
delay(5);
}
}

Monday, January 30, 2023

Tele-o: WiFi / Bluetooth to CV / Gate Eurorack Module


I made a Eurorack module that accepts WiFi or Bluetooth signals and outputs CV / Gate. 

Download hardware and software files here: https://github.com/little-scale/Tele-o-Module 

Friday, January 13, 2023

Minimal Case for Adafruit Feather nRF Sense - 3D Print


This is a Minimal Case for Adafruit nRF Sense Feather. Includes space for a 500 mAH battery. If the lid is printed in transparent PLA or similar, the neopixel colour and brightness can be seen through the material.

https://www.thingiverse.com/thing:5782601 

Minimal Case for 12 Gate / 16CV USB MIDI Interface - 3D Print


A minimal case for my 12 gate 16 CV USB MIDI interface

https://www.thingiverse.com/thing:5765817 

Sunday, January 01, 2023

Chromatic Drum Gate - 3D Print


A 3D printed case for the chromatic drum gate. 

Friday, June 10, 2022

OLED Display as Audio Spectrum Visualiser for Teensy 3.2

Turns a standard I2C OLED display into an audio spectrum visualiser! Audio signal is connected via a USB connection to the Teensy but can be easily modified for analog input. The Teensy displays the audio following FFT analysis using 128 bands from a mono signal. 

Code is here: https://github.com/little-scale/arduino-sketches/blob/master/OLED_FFT.ino 


Wednesday, June 08, 2022

LCD Display as Audio Spectrum Visualiser for Teensy 3.2

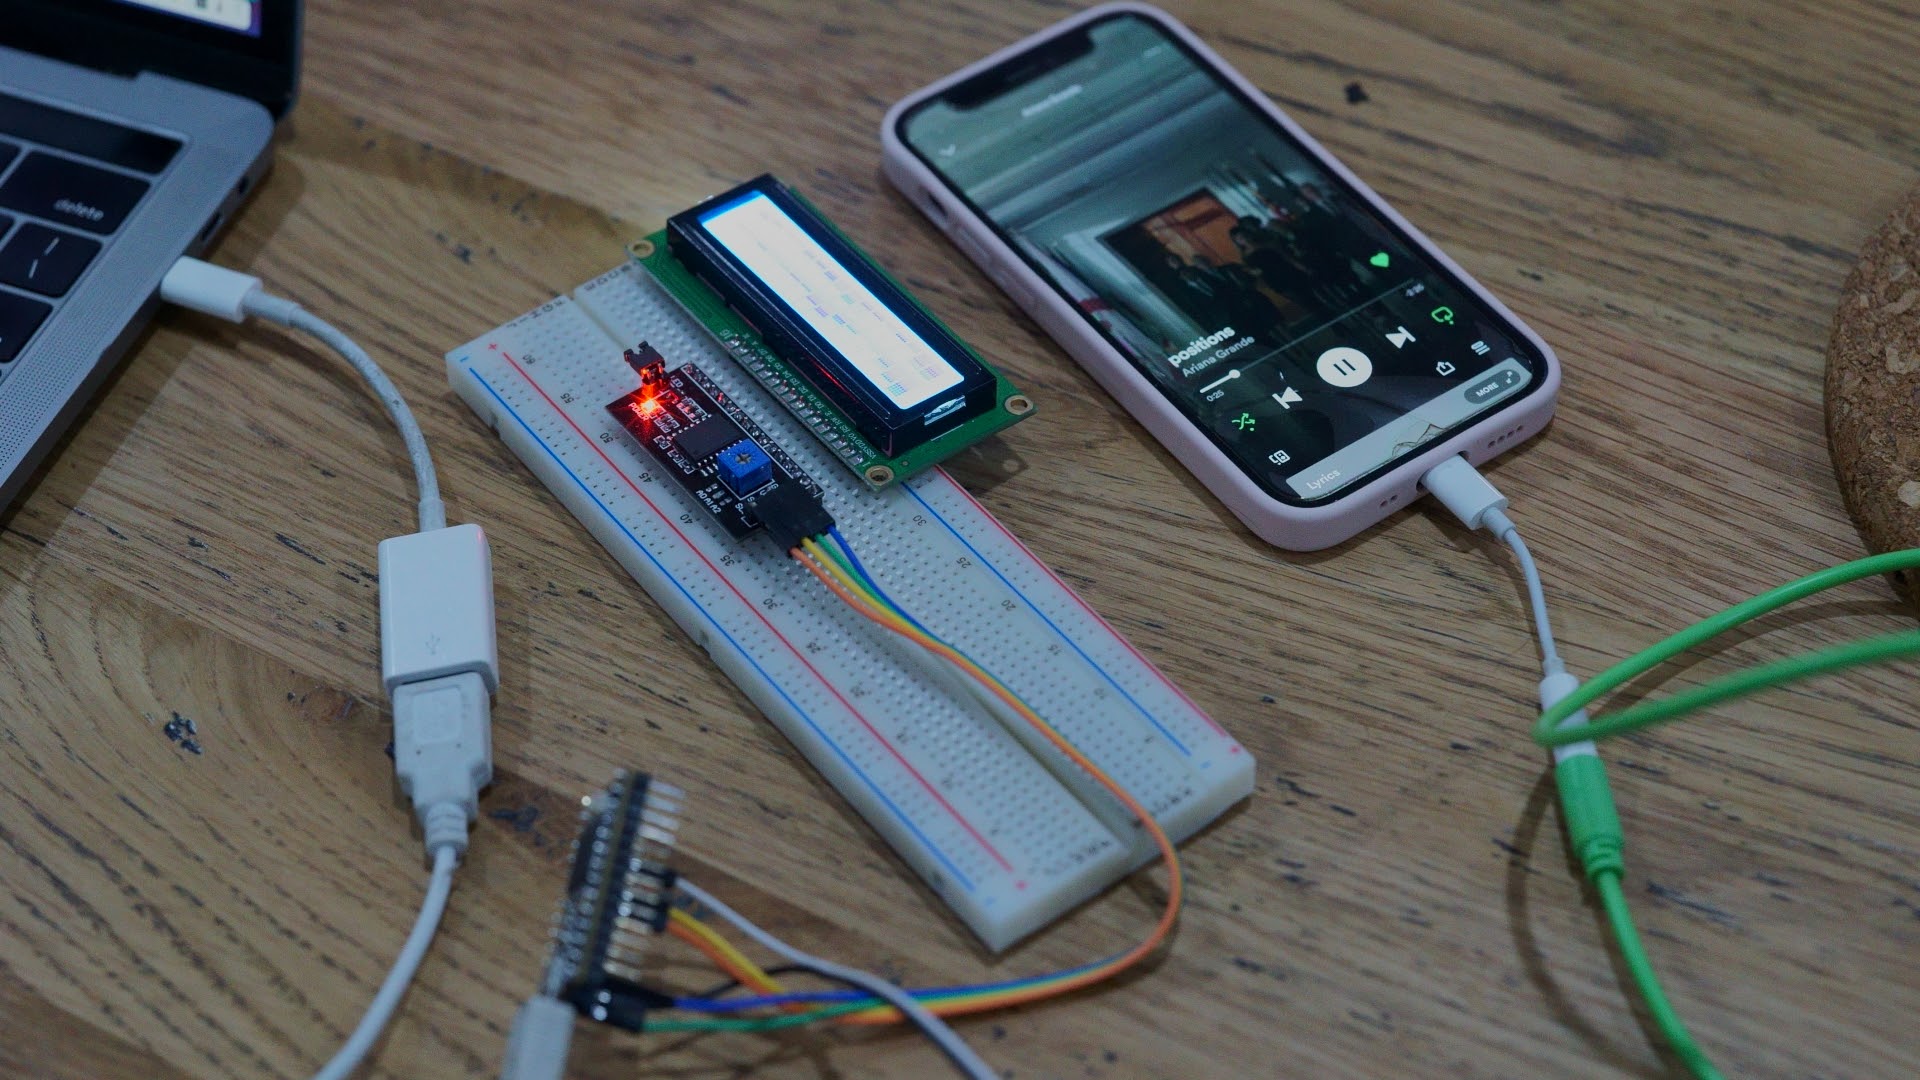
Turns a standard I2C LCD display into an audio spectrum visualiser! Audio signal is connected via the ADC input or via a USB connection to the Teensy. The Teensy displays the audio following FFT analysis using two 16-band displays made of custom LCD characters. 

Code is here: https://github.com/little-scale/arduino-sketches/blob/master/LCD_FFT.ino 


Saturday, June 19, 2021

16 CV Fader Bank with TouchOSC and Teensy

 I made a simple 16 channel control voltage fader bank using TouchOSC (which has recently been overhauled in a great way) and my 12 gate 16 cv MIDI interface via a Lightning to USB Camera Adapter. Download the TouchOSC layout here. 


Wednesday, May 05, 2021

Xiao Mx Ableton Control Surface Script

The Xiao can be mapped as a control surface to control transport from the cherry switches. I find this useful for my setup. The six buttons are mapped to rewind, fast forward, loop, play, stop, rec. 

Download the user config file here: https://github.com/little-scale/arduino-sketches/blob/master/xiao_mx/UserConfiguration.txt

Place this file in /Users/[Username]/Library/Preferences/Ableton/Live x.x.x/User Remote Scripts/XiaoMx/UserConfiguration.txt

Download the sketch here: https://github.com/little-scale/arduino-sketches/blob/master/xiao_mx/xiao_mx_control_surface_script.ino 

Upload this file to the Xiao board. In Ableton, open up preferences and go the Link Tempo MIDI tab. Select the XiaoMx script in the Control Surface drop down menu. Select the Xiao as the input and output. 


Xiao Mx MIDI Device

A simple MIDI device that uses the Adafruit TinyUSB library, a Seeed Studio Xiao, 6 Cherry Mx stabilised switches and 5 9mm Alpha pots. 

Code, schematic, PCB layout, Gerber files can be found here: https://github.com/little-scale/arduino-sketches/tree/master/xiao_mx 


Tuesday, April 20, 2021

Secret Handshake GameCube Controller


I made a sketch for my Secret Handshake USB host module to control Eurorack using a GameCube controller (with a GC to USB adaptor). 

View and download the code here: https://github.com/little-scale/eurorack/blob/master/USB_MIDI_Host/gc_controller.ino

Find out more about my Secret Handshake module here: http://little-scale.blogspot.com/2019/01/secret-handshake-diy-usb-midi-host.html

Monday, April 19, 2021

Secret Handshake Launchpad Mini Example Update


Update on my Secret Handshake module code - added input for clock (in 2 on the panel). 

View and download here: https://github.com/little-scale/eurorack/blob/master/USB_MIDI_Host/launchpad_mini.ino 

Saturday, January 02, 2021

Xiao M0 USB MIDI Clock Sync Example

I made a simple example for a Xiao M0 USB MIDI clock sync setup. This can be used to sync external gear to a computer via USB MIDI, but this also works for iOS devices and anything that can act as a USB host for standard MIDI devices. An easy way of syncing stuff to Ableton Link via the free Link to MIDI iOS app for example as well! 


Download the code here: https://github.com/little-scale/eurorack/blob/master/XIAO_M0_clock_sync/xiao_m0_clock_example.ino